


Summary
This post explains my latest experience in contributing to open source software with project KEDA.
Last week, the KEDA team have accepted and merged a Pull Request I created to support Pod Identity in the Event Hub scaler. @Simon Wight, an amazing community person, encouraged me to write about my experience (cheers for the nudge Simon :)), and this post is that.
I will explain how it all started, what I did to get it done, and all the fun and challenges that happened during that.
How it all started
My relation with KEDA started in mid 2019, I think it was a presentation by Jeff Hollan. At that time I was already working with Kubernetes, and I was already familiar Azure Functions. I have always been curious about scaling, whether it was Azure Functions or Containers, and KEDA came to complete this missing piece.
This explains the “interest” part of the contribution story, because no one can contribute to open source project, and give from their own time, unless the project is of interest to them. You need this spark to keep you going, because it’s not easy and at some point you WILL suspect yourself and say: “Oh man why am I doing this?!”.
Later in the year, I also was interested in learning Go, and this brought me closer to the idea that I can contribute to a project like KEDA.
One Step at a Time
The Pull Request (PR) that sparked this post was not my first contribution to KEDA, but it is definitely the biggest up until the moment of writing these words. I had to go by smaller steps, otherwise I would have been frustrated and left the thing from the beginning. So how did it start?
Understanding The Code, and Contributing Docs
Before I had the intention to contribute KEDA, I was curious to understand how it works. I have always believed that in order to use a tool efficiently, you have to go one level of abstraction deeper, and if I wanted to understand how KEDA works then I need to check out the code.
So I did that! I cloned the code, and I started examining it, trying to understand it. This didn’t only give me an advantage of understanding KEDA, it was a very good way to learn Go itself. It’s worth mentioning here that I didn’t even try to build it; I didn’t have the intention to contribute at that moment and I didn’t want to go through the hassle of installing the prerequisites.
Ater I became comfortable with how it works, I noticed that there are gaps in the documentation that are key to using KEDA in its full potential. So I decided to contribute to the documentation. I created my first PR to the docs, explaining how to write your own External Scaler.
This had two major benefits that helped in my future PRs:
1. I became familiar with the maintainers
I joined the KEDA Slack channel and had a couple of conversations with the maintainers on what is missing and what I intended to cover. This created a connection with the maintainers and allowed them, and myself, to understand the expectations, their method, and way of thinking. In my case the maintainers were: Tom Kerkhove, Zbynek Roubalik, and Ahmed ElSayed who are FANTASTIC people; they are helpful, encouraging, and appreciating, kudos to them!
2. I know more about the code now
After that, I was in a much better position to contribute code, I know how things work, in general, I know where to find code and how to navigate it.
This also put me in a good position to speak about it in user groups and conferences, and even give workshops.
In addition to that, I started writing an External Scaler live on Twitch. External Scalers are not part of KEDA’s binaries; they are an independent deployments that uses gRPC to communicate with KEDA.
All of this increased my bond with the project.
Contributing The First Lines of Code
This is where things get harder, but also more exciting!
Let’s just build it for now!
I already have cloned the repository, and already navigated it, now it’s time to run it. I didn’t want to do anything except a successful build and deployment; if I do these two successfully, I would have finished more than two thirds my way towards the first commit!
The reason is that there can be a lot of things that go wrong, even for such a simple task. You are setting a new environment from scratch, and making sure all the prerequisites and dependencies are installed the right way with the right version.
Reading the Contribution guide
So I read the contribution guide, this is where you should start with any OSS you want to contribute to. Rather than fighting your way by “discovering” code, reading the contribution guide will show you at least the entry point. (Dah! but we also don’t read manuals to set up a washing machine, do we now!)
However, the documentation was not complete at that time, and I had to do some discovery in order to have a successful build and deployment, and the right place for that discovery was the Makefile (or the build script in other repos).
Following the Contribution guide, and wiggling my way through reading the Makefile, I managed to have a successful build and local deployment. This was another opportunity to contribute to the documentation, and I did (along with other stuff).
Finding the smallest code contribution possible
Ok, now I am ready! I want to find the smallest contribution that doesn’t require a lot of effort or knowledge. The easiest way to find that out is to search for bugs in the repo’s Issues.
Why a bug? because solving bugs is like solving a jigsaw puzzle that is already very close to being completed; a lot of the pieces are already there, you just need to fit the last couple of ones. Also, the expectation is very clear; this is why maintainers classify it as a bug, so achieving the result should be straight forward.
For my luck, when I was trying to run my deployment locally, I was using an sample that had a bug already! I thought it was something I did, so I searched for it in the repo’s Issues, and I found that someone already reported it, perfect! It seems it’s a legitimate bug, and maybe I should try solving it.
So I rolled my sleaves, opened the code, searched for that error string in the code, and found it. Traversing it back, I understood what the problem was, and thus the solution was relatively simple.
Code contribution workflow, and creating the PR
So what does the code change workflow look like?

This will depend on how comfortable you are with Git, but I do the following:
- Fork the repo to my GitHub account
- Clone my new fork to my disk (name the remote “eashi”)
- Add the original repo as another remote “origin”. So by now I have two remotes: “origin” from the remote repo, and “eashi” that is my fork. (you can swap the names, up to you)
- Create a branch for the new code
- Push the new branch to my repo
- Create a PR from the new branch in “eashi” to the “main” branch in the “origin” repo.
- After the maintainers merge the PR to the “main” branch in the project, I pull from the “main” in “origin” to the “main” branch in “eashi”.
One step I didn’t mention it above: I pull from the “origin main” to my repo’s “main” regularly if necessary.
Creating the PR
After I ran the code and validated that my code indeed solves the problem, I created a PR.
The description of the PR should make the goal of the code change clear, should describe how this PR achieves this goal, and it’s best if it includes reference to the issue that the PR is established upon.
Most of the projects these days provide a check-list of prerequisites that have to be met before the PR can be merged and accepted. Maintainers try to make this easy by providing a template, when the contributor creates the PR the initial description of the PR would explain how the PR should be structured.
In KEDA’s case, it’s 4 items:
- Commits are signed with Developer Certificate of Origin (DCO)
- Tests have been added
- A PR is opened to update the documentation on https://github.com/kedacore/keda-docs
- Changelog has been updated
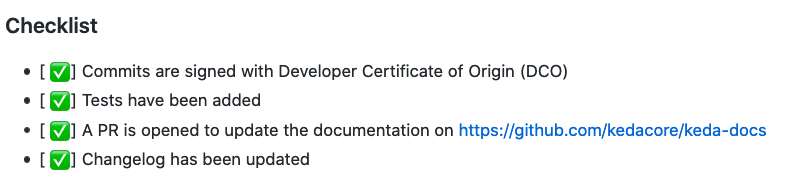
I made sure that I ticked all the boxes in the PR.
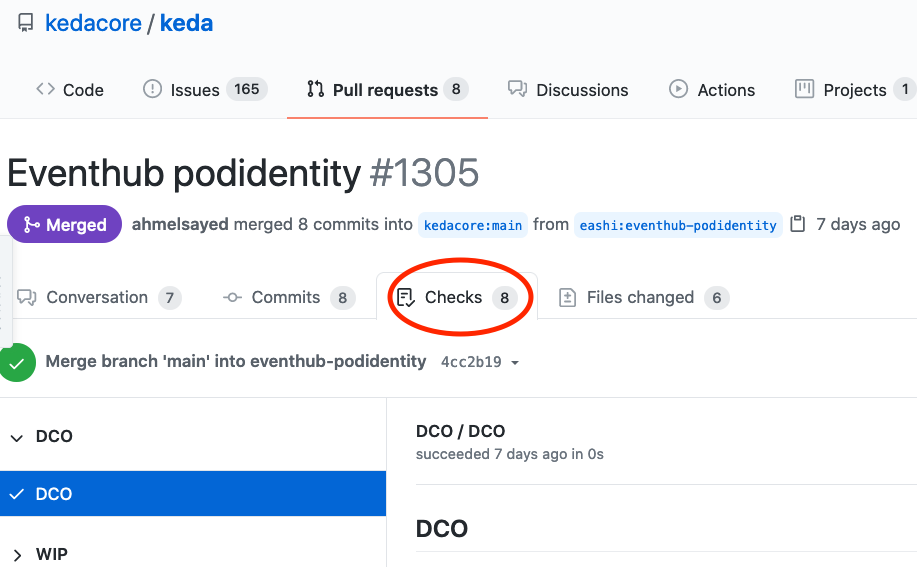
In addition to this manual check-list, there is another automated check-list that is PRs go through: the code needs to compile, the tests need to run successfully, and the code should be scanned.
Of course these checks also different from project to project, and with the help of GitHub Actions this can run on every PR created, or every update to the PR.
Be patient now!
After you have created the PR, it will take time: days, sometimes weeks! DON’T be pushy, hasty, rude, or disappointed. Maintainers are humans, and they have families and priorities. This might not be their fulltime job, and this PR might NOT be the top of their priority.
It’s good that you have given from your time to contribute to the project, maintainers will really appreciate it, trust that if it takes time before they merge or comment on your PR doesn’t mean that they don’t value your contribution.
Receiving feedback on PR, and actioning on it
It’s very rare that the PR will be merged without comments or feedback, most of the time maintainers will have questions, at least. Any line of code is added to the repo is a responsibility, and it’s good for all parties, including you, to only allow code that is of good quality and of a good reason.
Don’t take the feedback personally, if you don’t agree with their comments try to have a good conversation about it, assume their best intentions and try to convince them why things should be done your way. If they are not convinced don’t be frustrated, after all it’s their responsibility to be that quality gate.
Just a reminder here, that we are still talking about a small contribution like a bug for example. In theory, this should have very little debate.
But I want to contribute a bigger and more important code
This brings us to the PR that sparked this post. After I got more comfortable with the project as explained above, I felt I can take a bigger change.
So I started looking for Issues that are little bigger than a bug, and I found one that is perfect for me! At that time, I was interested in Azure’s Pod Identity, I read a couple of articles about it and I got the basic concepts, but it was not too clear in my head.
The issue I found was “support AAD Pod Identity authentication for azure event hubs“. It’s something I am already interested in, it’s a little bit bigger than a bug, and it’s something I THINK I can deliver. Was I confident that I could do this? Not really, and that’s alright! If you find yourself in such a situation don’t worry, try to embark on the mission and you will learn your way through.
Sometimes there isn’t a clear Issue that makes things easier for contributors, in this case I urge you to reach out to the contributors on chat/Twitter or whatever means to express your interest in helping, they will guide you.
So I put a comment on the Issue to express my interest in doing it; there is a possibility that someone is already working on this Issue, and I don’t want to offend anyone, and I don’t to waste my effort.
How much effort was it?
From the minute I showed interest up until the PR was merged, it was 40 days. The change wasn’t big, it was mainly in two significant files, and around 60 lines of code. So where did the time go?!
-
Investigating and researching.
A lot of my time was investigating and researching; trying to understand the libraries I am depending on, and trying to understand how Pod Identity REALLY works.
-
Setting the dev environment
I already have mentioned above that I contributed small code changes before, but when I wanted to do this code change I have messed up my dev environment by installing different versions of the dependencies.
This caused some disruption and urged me to go the “Remote Containers” path, for which there was already some guidance in the Contribution guide. However, for some reason things didn’t work for me, and I had to wiggle my way through again to set things up.
I wanted to have a separate docs contribution for that part, but magically the bad behaviours stopped appearing 🤷🏻♂️. Keep in mind that this might happen to you too :).
-
Designing
This might be a little bit too mouthful for such a change, but I was trying to achieve the goal of the issue with the least amount of disruption to the code, and still adhere to the general spirit of the code.
-
Troubleshooting
This one was really hard, because debugging in Kubernetes is not too straight forward. I had to fill the code with logging statements and re-deploy everytime I figured out that I am in a blind spot. Contrary to the traditional “put a break point” way.
-
Code, deploy, and test cycle
The cycle of introducing the change, deploy it, run it, check the result, and then change code again was time consuming. Especially that it involved deploying to Azure AKS because the feature was Azure specific.’
This is where most of my time went, all from late nights and weekends.
Having an Azure Subscription
I am fortunate enough to have a subscription that I am not paying money for from my own pocket, this allowed me to really contribute to this feature. If I didn’t have such a subscription it would have been expensive contribution to OSS for me.
Thankfully as well, Microsoft announced in Ignite that you can shut down an AKS cluster “az aks stop/start..“, that made a good difference :).
Congratulations, The PR is Merged, Now What?
This needs a celebration 🎉! But this also means responsibility, I still worry at some point that my code might have a bug, but this comes with the package, and I believe that I have to keep an eye on the Issues to make sure I can fix whatever is reported.
Conclusion
It was a long journey, but it doesn’t have to be that way. Everybody is different; their priorities, capabilities, interest, time…etc.
So this isn’t necessarily a guidance, but it’s my experience in contributing to OSS, and I hope it will help you navigate your way through. 🙂